


 31717
31717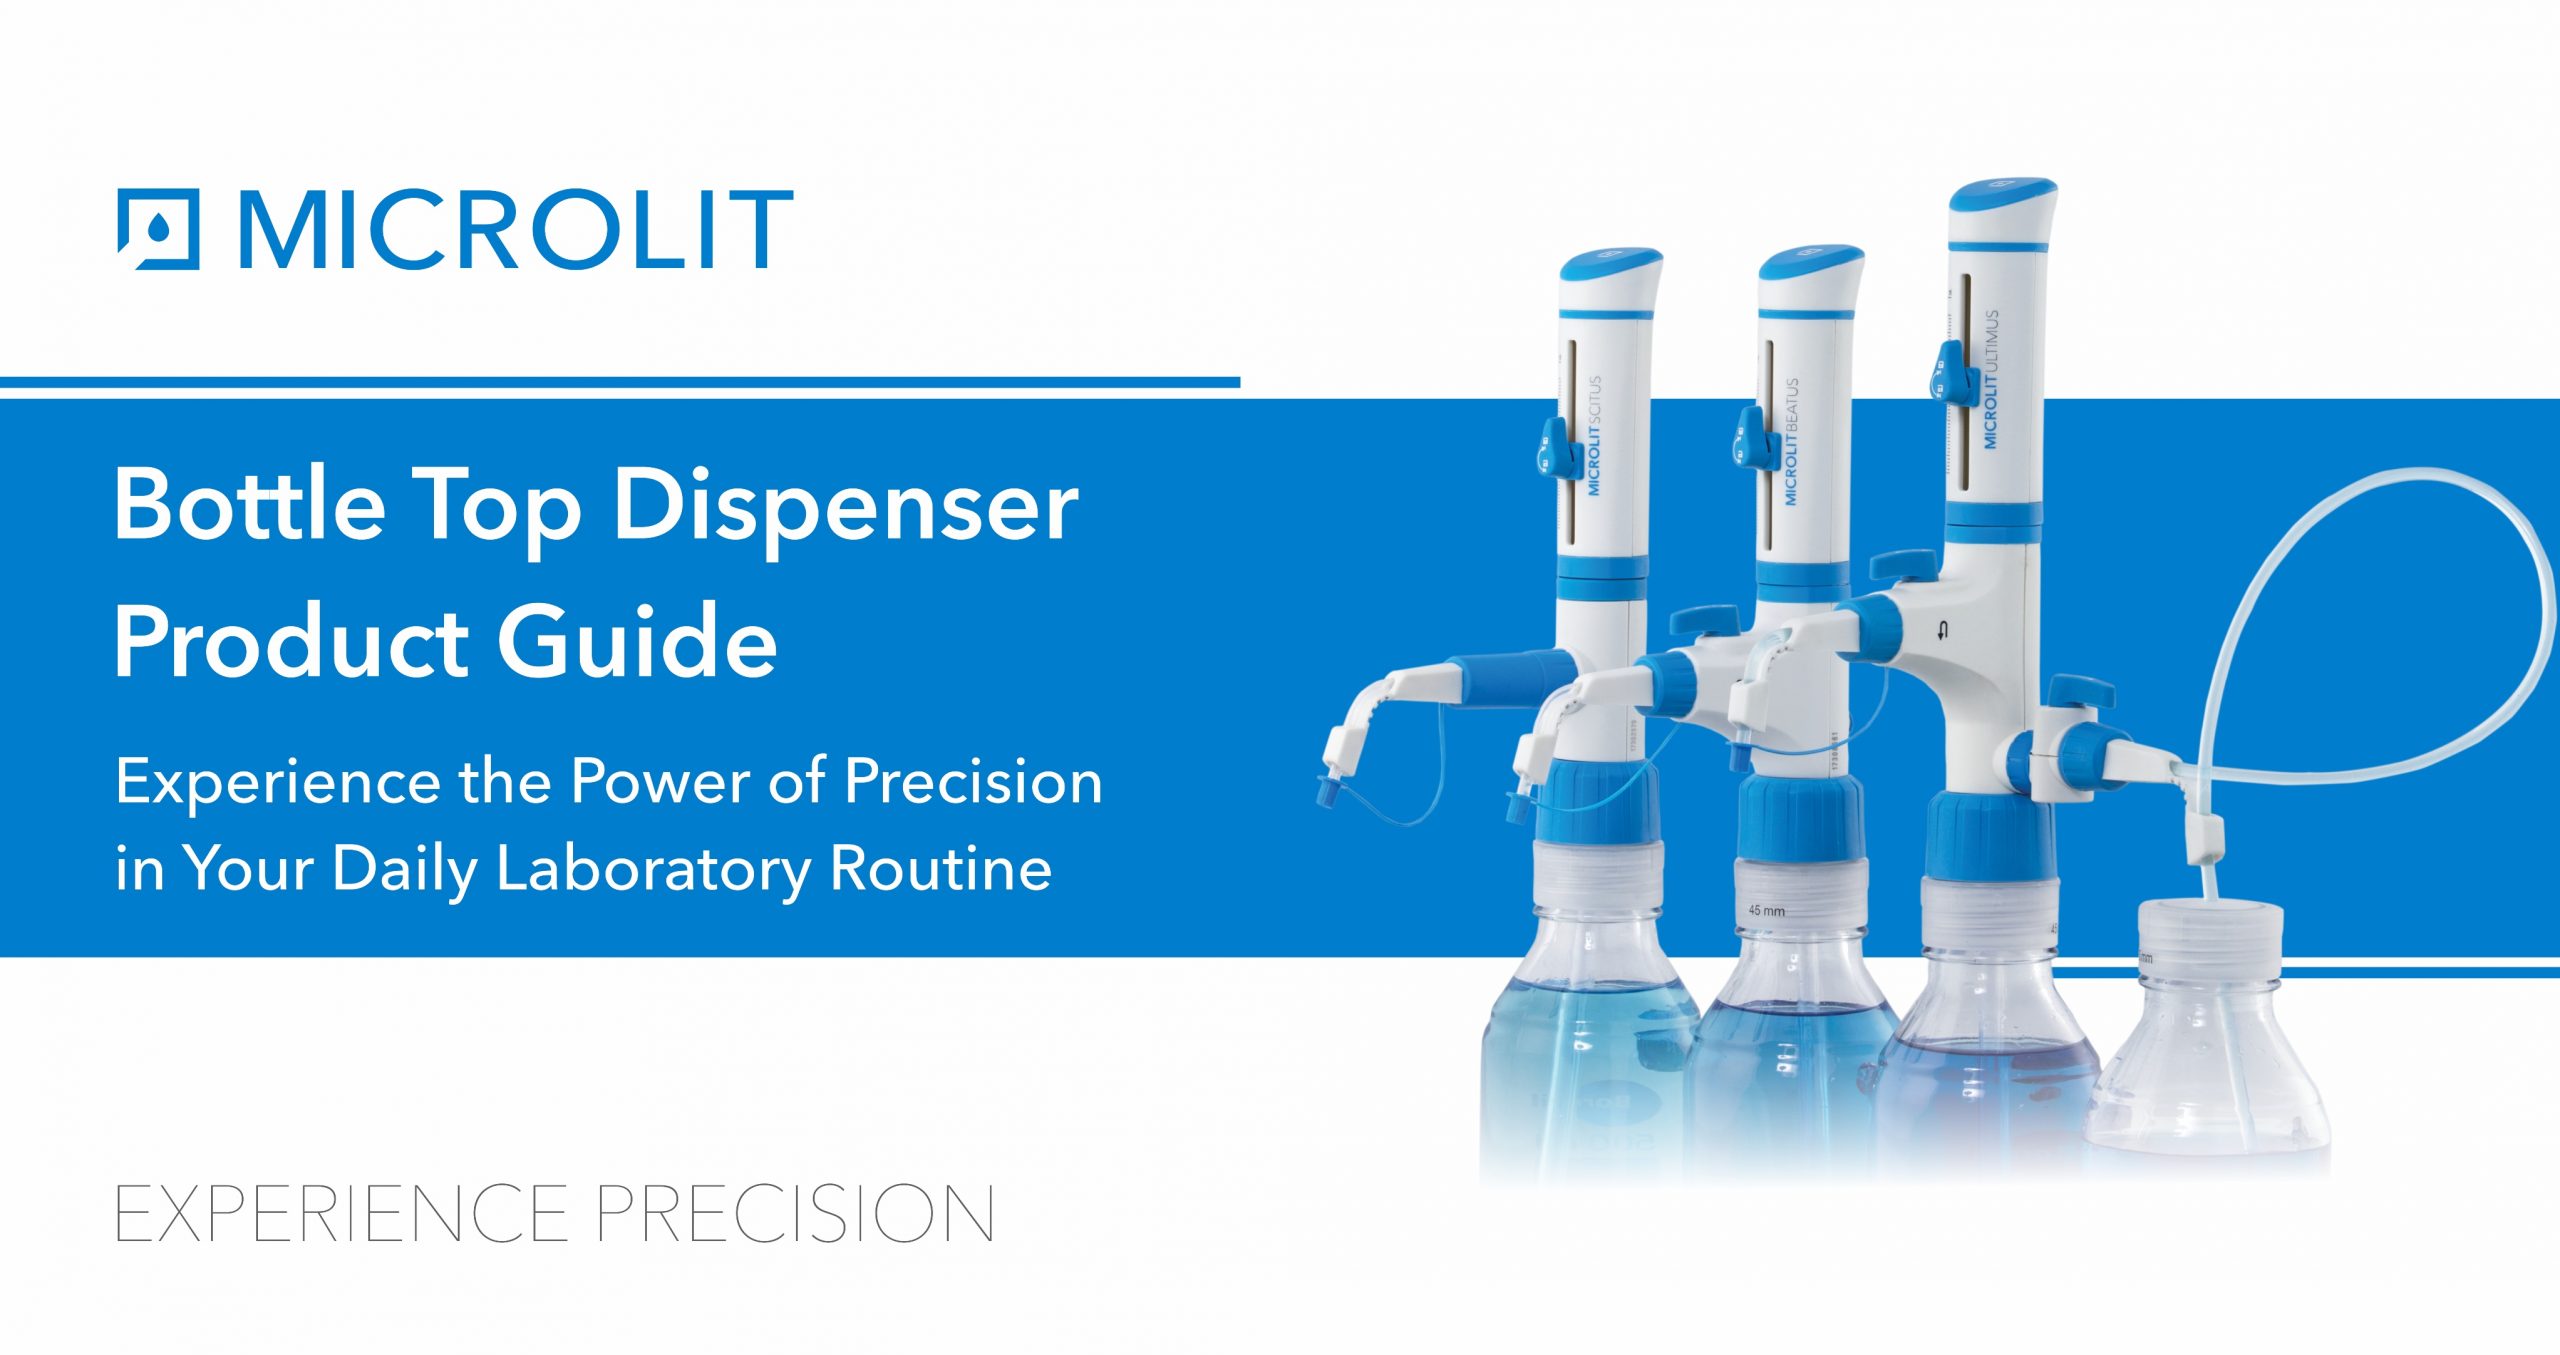
What is a bottle top dispenser?
A bottle top dispenser is a common lab instrument which is used to dispense precise amounts of chemicals/ reagents, organic and inorganic solvents, oils etc. from bottles or other containers. The process of dispensing manually poses several risks such as spilling of chemicals, inaccurate measurements and even fatal lab accidents. In order to prevent such hazards and enhance lab safety, Bottle Top Dispensers are the go-to instruments for dispensing reagents safely and precisely in a laboratory environment.
Bottle top dispensers can safely dispense a fixed amount of liquid usually between 1ml and 100 ml, directly from a bottle to a receiving container. Bottle top dispensers help reduce the loss of reagents, saves time and increases work efficiency. Along with facilitating routine lab tasks, bottle top dispensers also improve productivity by speeding up the entire laboratory experimentation process.
Components of a Bottle Top Dispenser:
Bottle top dispensers provide a closed environment for chemical dispensing preventing accidental spilling and reducing the risk of exposing users to hazardous chemicals. Bottle top dispensers are generally provided with a set of adapters which allow them to comfortably fit on bottles of varied neck sizes. Using a suitable adapter, a bottle top dispenser can be made to fit different sized laboratory bottles. The basic components of bottle top dispensers are listed below:
Piston:
The heart of the bottle top dispenser is a piston which creates the required vacuum in the barrel to be able to aspirate and dispense liquids precisely. By an upward movement of the piston, the preset amount of liquid draws up into the dispenser cylinder. Consequently, the downward movement of the piston enables the release of the liquid into the container via a dispensing valve. Since the piston comes in direct contact with the liquid or chemical to be dispensed, it is important that the piston material should be chemically inert to most of the reagents.
Glass Barrel:
Glass Barrel is used to hold the desired amount of reagent inside the instrument. When the piston is pulled upward, the liquid is plated into the glass barrel and when the piston is pushed down the liquid exits through the discharge tube. A polypropylene cover protects the glass barrel and prevents the glass from splattering in case of any accidental breakage.
Volume Adjustment Knob:
The volume adjustment knob is used to set the target volume which the user wants to be dispensed using the bottle top dispenser. It has a pointer which points to the volume scale printed on the bottle top dispenser housing. The volume can be set by releasing the lock by rotating the knob 180 degrees anticlockwise, moving it to the desired position and locking it by rotating it 180 degrees clockwise.
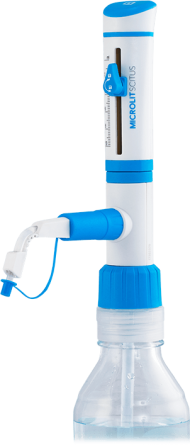
Dispensing Nozzle:
This component is used to dispense the liquid safely in the receiving vessel. The dispensing nozzle is flexible in the case of Microlit bottle top dispensers to easily direct the flow of liquid.
Nozzle Cap:
The nozzle cap prevents any unwanted drops at the workplace and avoids contact with hazardous chemicals.
Inlet Tube:
Inlet tubes are used to draw up liquid from the reagent bottle. The tube is telescopic in nature and length of the inlet tube can be adjusted according to a variety of reagent bottle sizes.
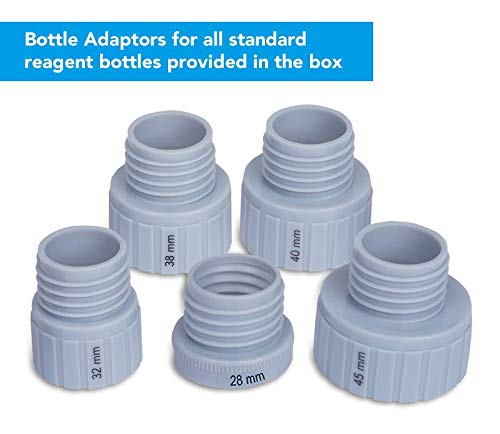
Bottle adapter:
Bottle adapters are used to mount the bottle top dispensers on the reagent bottles of varied necks sizes. Microlit Bottle Top Dispensers are provided with a set of 5 adapters: 28 mm, 32 mm, 38 mm, 40 mm and 45 mm which allow the dispensers to be used with almost all the laboratory reagent bottles.
 |
Types of Bottle Top Dispensers:
Bottle top dispensers can be classified depending upon:
1. Piston Mechanism:
-
Bottle top dispenser with floating piston:
This type of bottle top dispenser does not require any piston seal which makes it very durable and maintenance friendly. The piston fits into the dispensing cylinder without contact with any surface. The piston and cylinder are separated by a slight gap (around 1 millimeter) which is filled with the liquid. This slight film of liquid acts as a lubricant for the piston which helps it to glide very easily while dispensing.
-
Bottle Top Dispenser with wiping-seal piston:
This type of bottle top dispenser comes with a wiping-seal in addition to the floating piston mechanism. Due to this, the system requires higher operating force during liquid delivery which can lead to faulty sealing due to friction wear.
2. Chemical compatibility of the instrument:
-
Bottle top dispenser for highly corrosive acids
The traditional bottle top dispensers with glass barrels cannot be used to dispense highly corrosive chemicals like the Hydrofluoric Acid (HF) and other high-purity media as these may erode the inner surface of the equipment, forming cracks and leading to serious accidents. Thus, a high precision liquid handling instrument engineered with carefully selected and tested materials for use with Hydrofluoric Acid (HF) should be used in this case. MICROLIT LENTUS™ is one such instrument.
The components of the liquid path are carefully chosen so that they do not react/get corroded while getting in contact with the highly corrosive acids.
-
Bottle top dispenser for acids, bases and solvents :
Thesebottle top dispensers have a glass barrel, PFA coated or PTFE piston which makes the dispensers compatible with most of the acids, bases and solvents. Such dispensers have two valves with glass balls.
Inlet Valve: This valve is vertical. It operates under gravity and does not require a spring to hold the glass ball in its position, in order to keep the valve closed.
Outlet Valve: This valve is horizontal. It requires a spring to keep the glass ball in its position, in order to keep the valve closed while aspirating reagents in the barrel. It opens only when a reagent is being dispensed.
The spring housed in the outlet valve, poses problems of spring metal reactivity and chemical deposition.
Hence, Microlit dispensers break the norm by having both inlet and outlet valves in the vertical position. This enables us to eliminate the spring from the valve system as no force is required to keep the ball in its default state
Microlit offers the most innovative bottle top dispensers equipped with the award winning SpringlessValve™ technology. The Springless Valve™ technology makes these dispensers universal and compatible with both organic and inorganic solvents.
Size and Range / Technical Specifications:
Bottle Top dispensers are available in different volumes ranging from 0.25ml to 100ml. The commonly used variants of bottle top dispensers are listed below along with their permissible error limits as specified in the DIN EN ISO 8655-5.
| Volume Range | Increment | Accuracy |
CV |
||
| +% | +ml | +% | +ml | ||
| 0.25-2.5 ml | 0.05 ml | 0.5 | 0.0125 | 0.2 | 0.005 |
| 0.50-5 ml | 0.1 ml | 0.5 | 0.025 | 0.2 | 0.01 |
| 1-10 ml | 0.2 ml | 0.5 | 0.05 | 0.1 | 0.01 |
| 2.5-30 ml | 0.5 ml | 0.5 | 0.15 | 0.1 | 0.03 |
| 5-60 ml | 1.0 ml | 0.5 | 0.3 | 0.1 | 0.06 |
| 10-100 ml | 2.0 ml | 0.5 | 0.5 | 0.1 | 0.1 |
How to operate a Bottle Top Dispenser?
It is quite simple to operate any bottle top dispenser. However, proper setup instructions must be followed to avoid risk of spillage or other accidents in the laboratory:
1. Checking the calibration report:
- Start by checking the calibration report generated for the bottle top dispenser.
- The report must indicate that the dispenser is calibrated at an ISO 17025 certified laboratory.
- You may estimate the performance of the instrument by examining error limits mentioned on the calibration report.
2. Choosing the right adapter:
- A set of bottle adapters are provided with the instrument to help mount the dispenser on standard reagent bottles.
- Adaptors are usually made with polypropylene (PP) to avoid reactivity with most chemicals. ETFE/PTFE adaptors may be used for aggressive acids and solvents.
- Choosing the correct adaptor according to the neck size of your reagent bottle.
- The adapter comes in different sizes which are 28mm, 32mm, 38mm, 40mm and 45mm.
3. Attaching the inlet tube or extension
The telescoping tube can be adjusted according to the bottle size (height) and then fixed at the bottom of the bottle top dispenser.
4. Mounting the dispenser on the reagent bottle
After attaching the inlet tube to the dispenser, mount it on the reagent bottle and screw the dispenser tightly onto the bottle.
5. Purging the Dispenser
It is important to remove air bubbles from the dispenser dispenser barrel as these may cause inaccuracy in dispensing of the liquid. To do so:
- Turn on the recirculation knob by rotating it 90 degree anti-clockwise (This feature is only available in BEATUS and ULTIMUS bottle top dispensers)
- Aspirate and dispense a few times until this barrel is bubble-free
- Turn off the recirculation knob by rotating it clockwise towards the dispensing nozzle
- Aspirate and dispense to ensure bubble-free dispensing
6. Setting the right volume
- To begin dispensing, the user must determine the quantity (in ml) that is required for the experiment.
- EasyKnobTM is a specially designed volume adjustment knob that is available in all Microlit bottle top dispensers. It allows 180° rotation for locking and unlocking which results in simple and accurate volume adjustment.
7. Dispensing
Wear protective clothing, protective gear for the eyes and hands. To avoid splashes, dispensing must be done slowly.
Follow all the safety instructions and observe limitations of use and operating constraints.
- Remove cap from the discharge tube.
- Set the volume of liquid to be dispensed using the volume adjustment knob.
- Turn the valve to ‘Dispensing’.
- Gently lift the piston until the upper end. Press the piston downwards slowly and steadily with minimal force until it reaches the bottom and all the liquid in the barrel is dispensed.
- Wipe off the discharge tube against the inner wall of the receiving vessel.
Cleaning, maintenance and storage of a Bottle top dispenser
1. Cleaning based on usage
The instrument must be cleaned immediately in the following situations:
- The piston is hard to move
- The reagent to be dispensed in being changed
- After a long period of non usage
- Before sending for maintenance and repair work
- Before sterilization
- Regularly when using crystallizing liquids
2. Standard cleaning
Before beginning the cleaning process, the lab technician must wear protective glasses, clothing, and gloves.
- Dispense all liquid from the barrel – there should be no liquid before starting the cleaning process
- Place the instrument together with the bottle in an empty sink
- Unscrew the instrument and separate it from the bottle. The inlet tube is no longer immersed in the liquid
- Carefully tap the inlet tube against the inside of the reservoir until the reagent has completely drained out of the inlet tube
- Hold the dispensing nozzle over the reservoir’s aperture and apply piston stroke gently in order to return any contents into the reservoir.
- Empty the instrument completely
- You may then dispense distilled water through the system to clean it
- If the piston barrel is still not cleaned, you may need to dissemble the instrument and repeat the cleaning process again. Never use force to disassemble and reassemble the instrument. It may cause physical damage to the instrument.
3. Intensive Cleaning
Intensive cleaning must be done if the reagent is dense and viscous. It requires complete disassembling of the instrument so that all the parts can be cleaned separately. Before disassembling the instrument for intensive cleaning, do not forget to carry out standard cleaning procedures.
- Pull the cap outwards to expose the calibration nut and unscrew it with the help of a calibration tool to disassemble the piston.
- Pull out the shaft and rinse together with deionized water.
- Clean the cylinder with a bottle-brush. Carefully remove deposits at the edge of the glass cylinder.
- Flush all the parts such as delivery nozzle, pipe and cover etc. of the instrument with deionized water. Use soft brushes and a suitable cleaning agent to clean the instrument where needed.
Storage
It is important to store the bottle top dispenser properly for long-term applicability. The bottle top dispenser and all its accessories should be stored in a clean, cool and dry place. The temperature of the storage space should be from -20% C to 50 ° C (-4 ° F to 120 ° F), with relative humidity between 5% and 95%.
How to choose the right bottle top dispenser?
The bottle top dispenser is a widely used scientific tool to dispense chemical reagent precisely. Generally choosing a bottle top dispenser depends on the amount of liquid and its types. However, there are other factors to consider when choosing a right bottle top dispenser for the laboratory.
1. Chemical Compatibility:
When selecting a bottle top dispenser, the user should check the chemical compatibility of the dispenser with the reagent to be dispensed. Some manufacturers offer different bottle top dispenser models for different types of reagents – organics, inorganics, solvents etc. However, Microlit dispenser, with its unique SpringlessValve™ system is a universal dispenser for all types of reagents. All manufacturers offer a chemical compatibility chart with their dispensers. This includes all the commonly used reagents and their compatibility with the materials used in the construction of the dispenser. Please be sure to check this compatibility chart before making a purchase. The chemical compatibility for Microlit dispensers can be found here – https://www.microlit.us/wp-content/uploads/2019/01/chemical-compatibility-chart-Jan-2020-2-2.pdf
The commonly used reagents with bottle top dispensers can be categorized as follows:
- Acids: Examples include Acetic Acid, Hydrochloric Acid, Sulfuric Acid, and Nitric acid
- Bases: Examples include Acetyl chloride, Ammonia, Pyridine and sodium hydroxide
- Organic Reagents: Examples include Toluene, Methanol, Trichloro trifluoroethane and Dichloromethane.
- Highly Corrosive Acids: Hydrofluoric Acid
Note that Microlit offers a special bottle top dispenser Microlit LENTUS for use with highly corrosive acids. The materials used in this dispenser ensure that it is not affected by direct contact with corrosive acids.
2. Viscosity of the reagent:
If you need do dispense viscous liquids such as Essential Oils, Botanical Extracts, Grain Alcohol and Vegetable Glycerine, the applicable viscosity range for the dispenser needs to be considered.:
Highly viscous liquids with a kinematic viscosity of between 75 to 500mm2/second will require careful selection while reagents having kinematic viscosity below 75 mm2/second can be used with any kind of bottle top dispenser efficiently.
3. Capacity of the dispenser:
Bottle top dispenser comes in both fixed volume and adjustable volume models with specific range of liquid quantity. The volume can be adjusted either manually with the help of a knob or dialed electronically through a control panel. So it is necessary to make sure that your selected bottle top dispensers are able to dispense the amount of liquid that is frequently required for your experiments. Note that dispensers with lower capacity offer higher accuracy and precision. So, if you want to dispense 10ml, a 1-10ml dispenser is recommended over a 2.5-30ml dispenser to ensure more accurate results.
The Microlit Bottle Top Dispensers – Ultimus, Beatus, Scitus & Lentus™ – are also available in variable volumes.
| S.No. | Microlit Ultimus | Microlit Beatus | Microlit Scitus | Microlit Lentus™ |
| 1 | 0.25 – 2.5 ml | 0.25 – 2.5 ml | 0.25 – 2.5 ml | 0.25 – 2.5 ml |
| 2 | 0.5 – 5 ml | 0.5 – 5 ml | 0.5 – 5 ml | 0.5 – 5 ml |
| 3 | 1 – 10 ml | 1 – 10 ml | 1 – 10 ml | 1 – 10 ml |
| 4 | 2.5 – 30 ml | 2.5 – 30 ml | 2.5 – 30 ml | 2.5 – 30 ml |
| 5 | 5 – 60 ml | 5 – 60 ml | 5 – 60 ml | 5 – 60 ml |
| 6 | 10 – 100 ml | 10 – 100 ml | 10 – 100 ml |
How is a bottle top dispenser calibrated?
Each bottle top dispenser is individually calibrated in an ISO 17025 certified laboratory and comes with a calibration certificate. However, if environmental conditions and the viscosity of the liquid being used changes drastically, re-calibration is recommended to achieve high accuracy.
To re-calibrate the instrument, the below steps need to be followed:
- Set the bottle top dispenser at 50% of the nominal volume (capacity).
- Follow the common rules for calibration used in statistical quality control (ISO 8655/2).
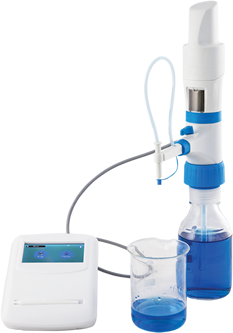
- Set the volume and dispense five volumes of distilled water at 20°C temperature on electronic balance to establish the actual mean volume of liquid dispensed.
- If the calculated average mean varies from the preset volume at the dispenser, re-calibration is required again.
- For re-calibration of the dispenser, pull the cap outwards to expose the calibration nut. Using the calibration tool, turn the nut clockwise to reduce the volume or anticlockwise to increase the volume and repeat the calibration procedure again to achieve the desired volume result.
How to sterilize a bottle top dispenser?
The dispenser can be autoclaved at 121°C (or 250°F) and 1 bar absolute (15 psi) with a holding time of at least 15 minutes.
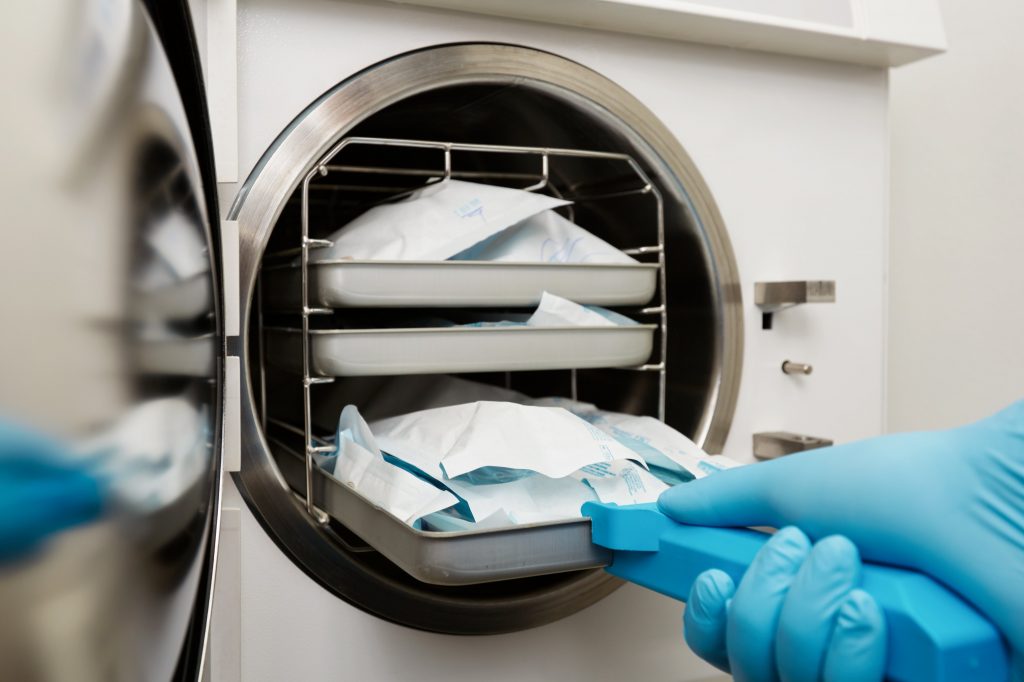 |
It is recommended to autoclave the instrument after disassembling for deep sterilization.
- First carry out standard cleaning of the instrument.
- Pull the cap outwards to expose the calibration and unscrew with the help of a calibration tool to disassemble the piston and shaft from the main housing.
- After unscrewing, pull out the shaft.
- Now autoclave both the assemblies at 121°C and 15 psi pressure for 15-20 minutes. Remember that the volume adjustment knob should always be kept in the unlocked position while the autoclaving process.
- Now remove the instrument and its parts from the autoclaving machine and cool it at room temperature for at least 2 hours before use.
- Reassemble the parts again. It is necessary to recalibrate the instrument after every autoclaving process for accurate dispensing.
When is bottle top dispenser calibration required?
Calibration is an important part of any laboratory practice. Like the other precision instruments, bottle top dispensers also need to be calibrated to maintain the reliability and accuracy of readings.
Normally the calibration process needs to be performed every 6-12 months depending upon the frequency of use of the dispenser.
However, there are other special cases where recalibration is required:
- Post autoclaving process
- Post repair or maintenance services
- Significantly changing the viscosity of the reagent to be dispensed
- Long period of non-usage
Applications of Bottle Top Dispensers
Bottle top dispensers are widely used in the fields of biology, chemistry, clinical medicine, industrial laboratories etc. due to the accurate and precise dispensing of liquids, enhanced safety, ease of use and convenience. Here are some common industries where bottle top dispensers are playing vital role in the sample preparation process:
- Pharmaceutical
- Healthcare
- Food and Beverages
- Environmental Monitoring
- Academic & Research Institutes
- Life Science
Benefits of using a Bottle Top Dispenser
Bottle top dispenser is a common yet essential laboratory instrument for liquid dispensing. Some of the benefits of bottle top dispenser are:
- Bottle Top Dispensers help to dispense highly corrosive acids such as the Hydrofluoric Acid safely and accurately. Mis-handling of such chemicals can put your health and skin at risk.
- Bottle top dispensers make the reagent movement hassle-free. They eliminate the risk of splashing of the reagent while dispensing.
- With the high precision technology, bottle top dispensers can easily transfer small quantities of liquids very accurately. The accuracy of the dispenser depends on the variety of bottle top dispenser which can be within ±0.5% – ±0.6% tolerance as per ISO 8655 dispensing standard.
- Some dispensers come with the recirculation valve technology which helps in reducing the wastage of liquid during the purging process and avoid spillage of chemicals during storage.
- Along with facilitating complex lab tasks, Bottle Top Dispensers also improve productivity by speeding up the experimentation process.
Why are Microlit Bottle Top Dispensers the best choice for your lab?
A bottle top dispenser is an innovative scientific instrument popularly used in many research institutes, biotechnology labs, wineries, food & beverage industries and other similar industries. Bottle Top Dispensers eliminate the risks of spillage and wastage of chemical reagents. Sometimes, choosing the right bottle top becomes a difficult task as many bottle top dispensers are available in the market with their limited dispensing features.
Some of the key features present in Microlit Bottle Top Dispensers are given below:
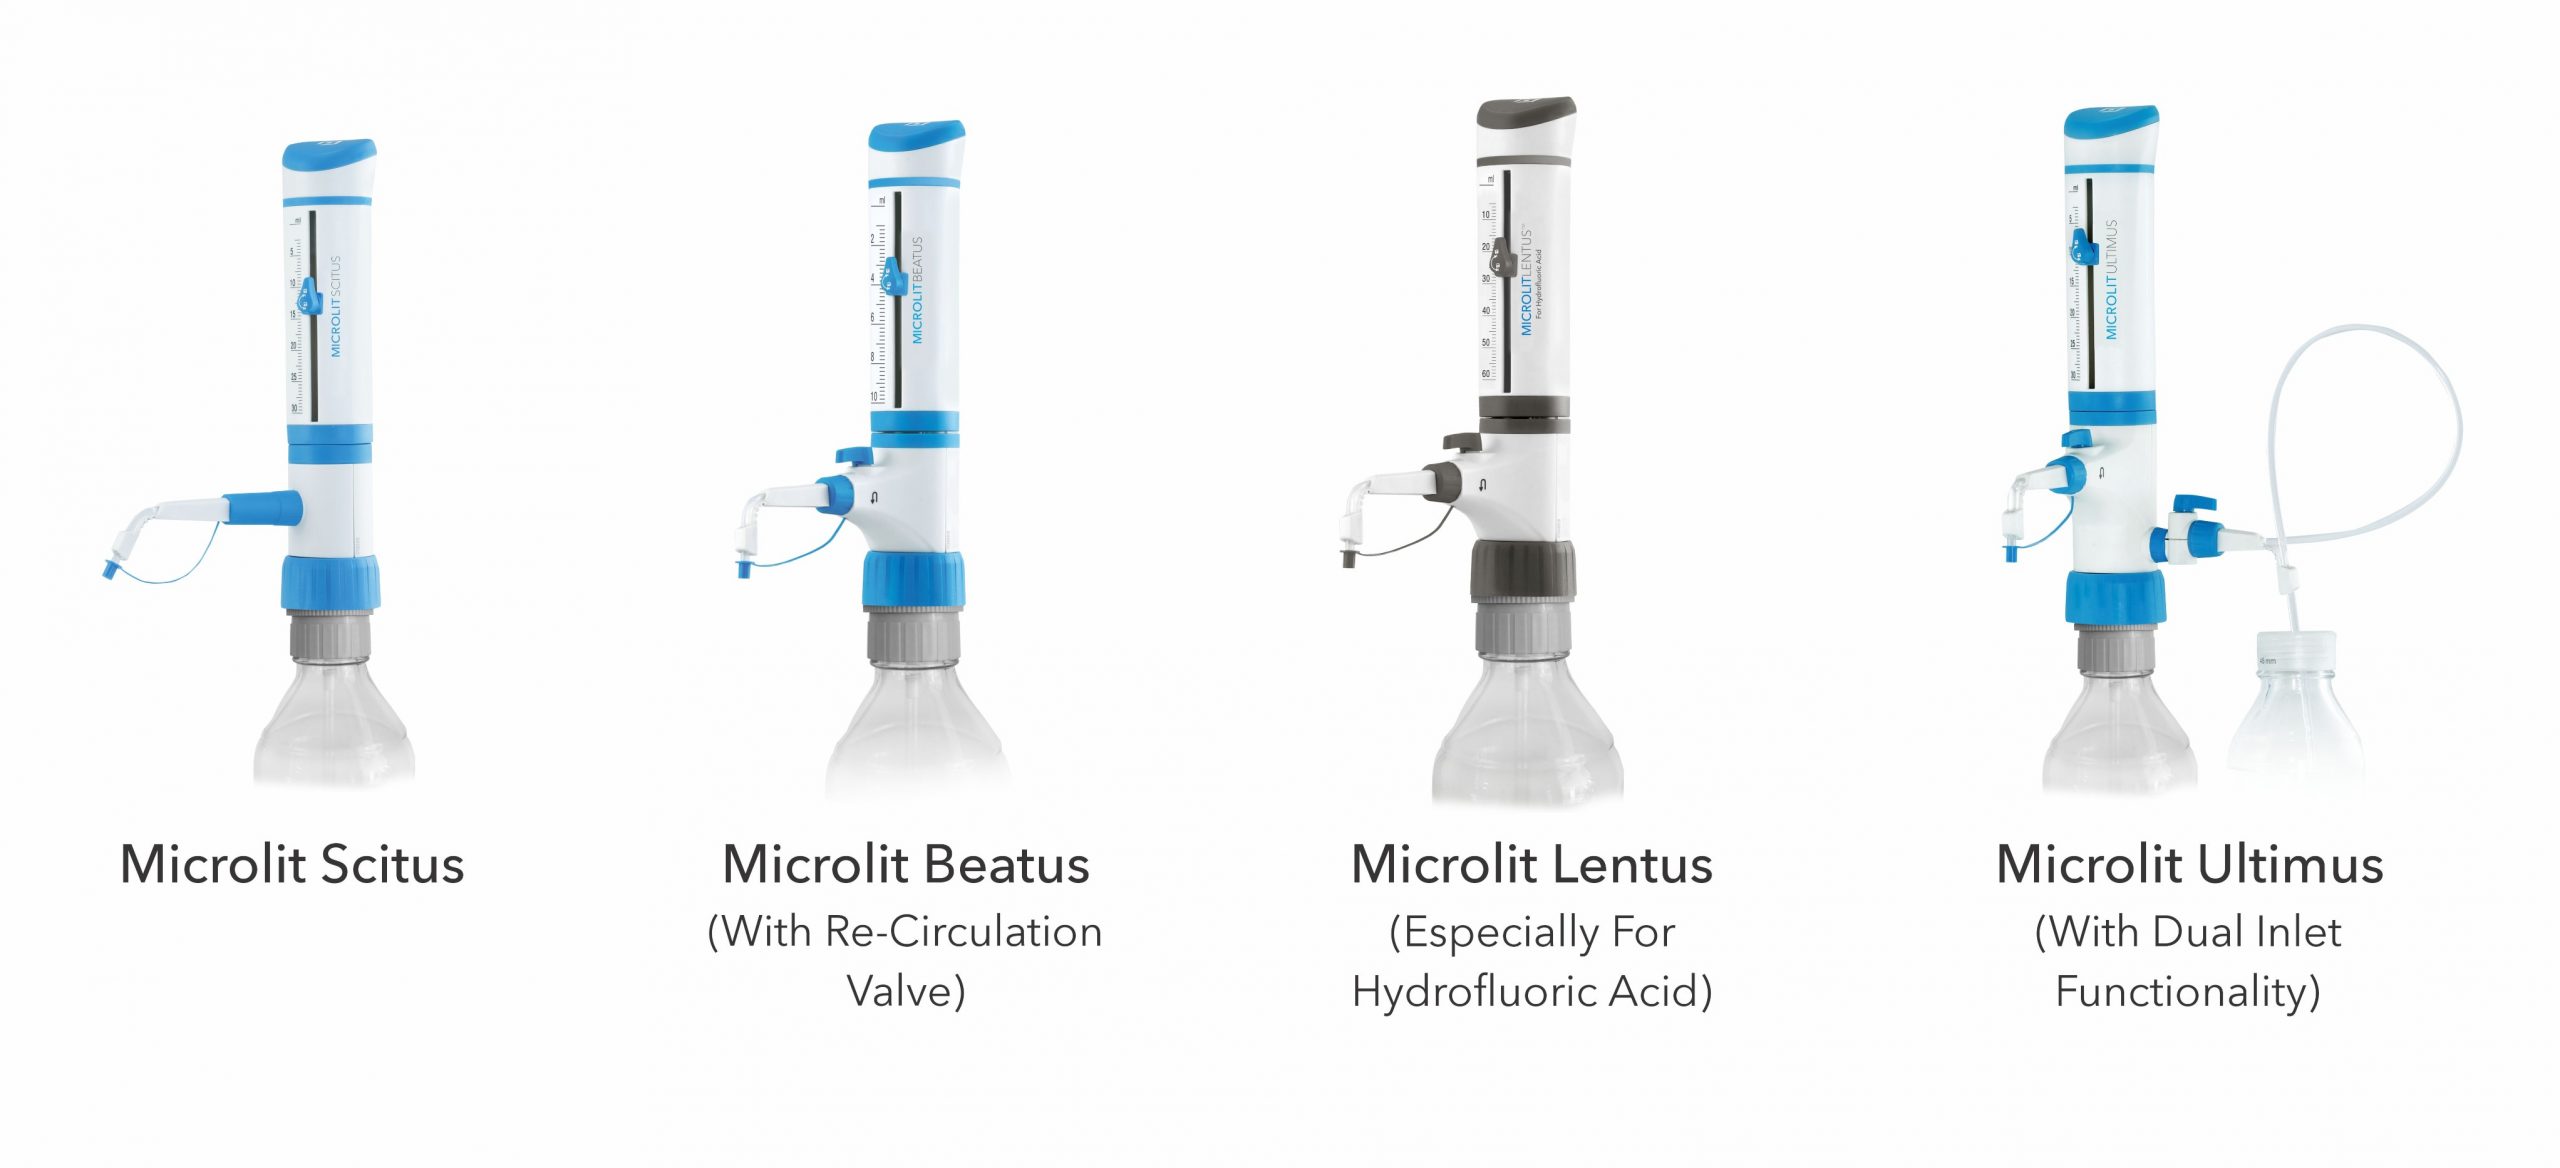
Feature exclusive to Microlit Ultimus:
Dual Inlet™ Technology is an award-winning technology patented in India, the EU and the US. Microlit Ultimus with dual inlet technology is a state-of-the-art bottle top dispenser. It offers 4 liquid handling modes – rinsing, dilution, bottle refilling and dual liquid handling in a single unit without dismounting the instrument from the reagent bottle.
Feature exclusive to Microlit Lentus™:
Microlit Lentus™ is made using chemically-inert materials and a high purity ceramic valve system which ensures safe and accurate dispensing of the Hydrofluoric Acid and High Purity Media.
Feature exclusive to Microlit Beatus & Microlit Lentus™:
Recirculation valve prevents the loss of reagents during purging so that they can be re-directed into the mounted bottle and facilitate bubble-free dispensing.
Features common across all Microlit Bottle Top Dispensers – Ultimus, Beatus, Scitus & Lentus™
- SpringlessValve™ facilitates smooth & jam-free dispensing.
- EasyKnob™ is a specially designed volume adjustment knob that allows 180° rotation for easy & effortless volume setting.
FlexiNozzle™ is an adjustable delivery nozzle. It offers a high level of flexibility, facilitating easy dispensing in demanding laboratory conditions.
Troubleshooting:
| Issue | Possible Root Cause | Solution |
| Piston Jam |
|
|
| Dispensing issue/ No reagent is aspirated |
|
|
| Air bubbles in aspirated liquid |
|
|
| Wrong dispensing volume |
|
|
| Barrel does not fill with reagent |
|
|
| Filling is not possible |
|
|
| Leakage |
|
|
FAQs:
How do I remove small air bubbles from the barrel?
To remove the air bubbles from the barrel, purging or priming needs to be performed. For priming, gently pull the piston up and then push down till the piston hits the base. Repeat the steps 4-5 times.
Can a bottle top dispenser be autoclaved?
Yes, autoclaving is important to sterilize the bottle top dispenser. Autoclaving can be done at 121° C, 15PSI. for 15-20 mins. Before autoclaving, instruments should be disassembled properly and the volume knob must be kept in an unlocked position.
How should I clean the dispenser?
It is recommended to rinse the dispenser with deionized or distilled water before and after the use. For sensitive or sticky reagent, intensive cleaning is required. For details, please check the cleaning and maintenance section above.
Is an adapter necessary for a bottle top dispenser?
Yes, an adapter is necessary if you want to use a bottle top dispenser with any kind of bottle. Mostly bottle top dispenser comes with different standard size adapters which fit to maximum standard size bottle neck.
Is the telescopic tube extendable?
Telescopic tubes can be extended as per the reagent bottle. For the minimum and maximum limit of the telescopic tube, you can see the instruction manual provided with the bottle top dispenser.
Can bottle top dispensers be used for any kind of liquid?
It depends on the liquid and the bottle top dispenser limitation. Mostly bottle top dispensers can be used efficiently with liquids which have kinematic viscosity less than 75 mm2/second. For highly aggressive chemicals like the Hydrofluoric Acid, a special bottle top dispenser is required for proper dispensing. Check the chemical compatibility chart before dispensing such liquids.
What is the function of the recirculation valve?
The recirculation valve allows to purge or prime the dispenser without wasting the reagents. Before the first use, the dispenser needs to be primed to remove air bubbles. With a recirculation valve, the reagent is not wasted during priming.
Bottle top dispenser is drawing up bubbles and liquid. What should i do?
There is an air leak somewhere in your dispenser. This may be due to the filling and discharging valves. Check whether the filling and discharge valves are tight. Also, the cylinder may crack or loosen from the valve block if the dispenser is accidentally dropped.
Does the dispenser come with the bottle?
No, Bottle Top Dispenser does not come with the bottle. The dispenser is designed to fit with adapters which can be fitted on reagent bottles of varied neck sizes. Microlit bottle top dispenser comes with five adapters such as 28mm, 32mm, 38mm, 40mm and 45mm. Choose the bottle adapter according to the reagent bottle and mount it with your dispenser to dispense properly.
What are the autoclaving (sterilization) parameters?
By standard, the instrument should be autoclaved at 121 ° C with 15psi for 15–20 mins. It is recommended to disassemble the equipment prior to steam sterilization for proper cleaning. All microlit dispensers come with the autoclaving feature to improve the safety of technician and testing results.
What do “Instrument Calibration”, “Gravimetric testing”, and “Volume Adjustment” mean?
Instrument calibration actually refers to the task of measuring the results from an instrument and determining its accuracy and precision.
Gravimetric testing is one of the methods of performing calibration. This usually means repeated weighing of dispensed water of distilled water. Distilled water has a defined density at specific temperature and atmospheric pressure. By finding the mass of water, it is possible to find the actual volume, and from that, determine the accuracy and precision of the instrument.
Volumetric adjustment is the physical change in the instrument which was calibrated.
Can temperature make a big difference in gravimetric testing?
Yes, it can. Calibration should be done in an ideal room temperature as per standard. When calibration is performed, temperature should be recorded with a thermometer having an error tolerance of max 0.2°C.
To know more about Microlit Bottle Top Dispensers, please visit the Microlit product page Bottle Top Dispensers.