


 166546
What is a Burette?
Burette is an essential laboratory instrument, commonly used in the titration process for quantitative analysis in many industrial chemical tests where solutions of known concentration are used to find the concentration of unknown solutions.
Burette Uses in Laboratory
Burettes are vital in laboratories for precise liquid measurement and dispensing. Commonly used in laboratory titrations, they determine unknown solution concentrations accurately. Their versatility extends to various applications, including acid-base and redox reactions. Burette use is crucial in quantitative chemical analysis, making them indispensable in scientific research and educational settings. Uses of burette also encompass base burette laboratory apparatus uses, highlighting their integral role in diverse experimental procedures.
History of Burette
The burette, a cornerstone in chemical analysis, traces its origins to late 18th-century France. Its development is credited to the French chemist Joseph Louis Gay-Lussac, who enhanced its design to enable precise titration. This groundbreaking innovation marked a significant milestone in analytical chemistry, allowing scientists to measure and dispense liquids with exceptional accuracy. Gay-Lussac’s improvements transformed the burette into a reliable tool for quantitative experiments, revolutionizing laboratory practices. Over time, the burette evolved further, incorporating advanced materials and features to enhance precision and ease of use. Today, it remains an essential instrument in laboratories worldwide, symbolizing the progress of scientific innovation.”
Before learning more about a Burette function in laboratory, let’s get to understand the titration process in detail.
What is a Titration?
Titration is a method commonly used in a laboratory which uses a solution of a known concentration to analyse and determine the known concentration of another solution. Typically, the titrant (the known solution) is added from a burette to the known quantity of the analyte (the unknown solution) until the reaction is complete. Often, an indicator is used to usually signal the end of the reaction, the endpoint.
Types of Titration?
There are several types of titration with different goals and processes. However, the most common types of titration in quantitative chemical analysis are redox titration and acid-base titration.
These four common titrations are:
- Acid-base titrations
- Redox titrations
- Precipitation titrations
- Complexometric titrations
1. Acid-base Titration:
Acid-base titration is a chemical testing process used to determine the unknown concentration of an acid or base by neutralizing the other acid or base of known concentration. Acid-base titration can also be used to measure the purity of chemicals.
HA + BOH → BA + H2O
Acid + Alkali → Salt + Water
Or (H+) + (OH–) → H2O
Acid-base titration is based on the reaction that neutralization occurs between an base or an acidic and an analyte. In this kind of titration, a reagent is mixed with the sample solution until it reaches the required pH level. This type of titration mainly depends on the track change in the pH or pH meter.
2. Redox Titration:
Redox titration is a laboratory method of determining the concentration of a given analysis by creating a redox reaction between the titration and the analyte. Sometimes, This type of titration needs the use of a potentiometer or redox indicator. It is also known as Oxidation-reduction reaction.
Redox titration involves a transfer of electrons between the used Analyte and the titrant. These kind of titrations are named after the reagent that is used in are as follows:
- Permanganate Titrations
- Dichromate Titrations
- Iodimetric and Iodometric Titrations
Permanganate Titration
In this, the potassium permanganate is used as an oxidizing agent maintained with the use of dilute sulphuric acid. The solution remains colourless before the endpoint. The equation is:
2KMnO4 + 3H2SO4 → K2SO4 + 2MnSO4 + 3H2 + 5O
Or MnO4– + 8H + 5e → Mn2++ 4H2O
Dichromate Titration
In this titration, potassium dichromate is used as an oxidizing agent. The medium is maintained acidic by use of dilute sulphuric acid. The solution of potassium dichromate can be used in titration directly. The equation is:
K2Cr2O7 + 4H2SO4 → K2Cr2(SO4) + 4H2O + 3[O]
Or Cr2O27- + 14H + 6e → 2 Cr3+ + 7H2O
Iodimetric and iodometric Titration
The reduction of free iodine to iodide ions and oxidation of iodide ions to free occurs in Iodimetric and iodometric Titrations.
l2 + 2e → 2l–……………. (reduction process)
2l– + 2e → 2e ……………. (oxidation process)
The solution is used as an indicator. Free iodine is used in the iodometric titration, while in the iodometric titration an oxidation agent is used to react the process to liberate free iodine.
3. Precipitation Titration:
Precipitation titration is based on insoluble precipitation where two reacting substances are brought into contact, called precipitation titration. The titrant reacts with the analyte and forms an insoluble material. The titration continues until the analysis is completely consumed. When the titrant is excess it reacts with the indicator and signals to end the titration process.
For example, To determine the concentration of chloride ion in a certain solution, we can titrate this solution with a silver nitrate solution which is of known concentration. The reaction occurs as follows:
Ag+(aq) + Cl–(aq)→ AgCl(s)
As a white precipitate, AgCl can be seen to settle at the bottom of the reservoir during titration. The amount of silver ion used for the equivalence point is basically equal to the amount of chloride ion present.
4. Complexometric titration:
The complexometric titration is where an undivided complex is formed at an equivalence point. This is greater than the precipitation titrations, and there will be no error due to co-precipitation.
Hg2+ + 2SCN– → Hg(SCN)2
Ag+ + 2CN– → [Ag(CN)2]–
Ethylenediaminetetraacetic acid (EDTA) is an important solution that forms complexes with metals.
Detecting the end-point of a titration
End-point is a physical change of solution that indicates the completion of titration. It is used as a signal for testers to stop adding more titrant to the analyte. Usually, it is indicated by any form of a visual indicator like color change, a visible precipitate, or a change on an electronic readout.
Performing a routine titration to determine the concentration of a analyte
The following steps use a conventional glass burette to do the titration. The same experiment can also be performed with the help of an electronic burette, a better option that minimizes the risk posed by multiple sources of error that may occur with conventional glass burette:
- Place a known volume of the solution of unknown concentration (the analyte) in a flask and fill the solution of known concentration (the titrant) in the burette.
- Slowly open the burette tap and allow the titrant to come down in the analyte. Determine the correct titration speed – too slow and the titration duration is unnecessarily prolonged; too fast, and the equivalence point is exceeded.
- Keep track of the color of the analyte – completion of titration is usually indicated by color change.
Finally, if the titrant and analyte are in the 1: 1 mole ratio, use the following equation to determine the concentration of the analyte.
Mtitrant x Vtitrant = Manalyte x Vanalyte
where,
Mtitrant = Molarity (M) of the titrant,
Vtitrant = Volume (V) of the titrant,
Manalyte = Molarity (M) of the analyte, and,
Vanalyte = Volume (V) of the analyte.
Note: Molarity is the concentration of a solution expressed as the number of moles of solute per liter of solution.
Application of the Titration
Titration is actually referred to as volumetric analysis. It is a technique on which many industries rely on the development and analysis of major chemical compounds. Here are some notable uses in titration in various industries that affect many aspects of society:
Pharmaceutical Industry: A particular amount of chemicals is prescribed for the development of drugs. This measurement of the amount of chemicals is finalized by the process of titration. Various titration procedures such as purity analysis, content analysis, precipitation titrations and pH-stat titration are used in the pharmaceutical industry.
Wine Industry: Wine makers use titration during the winemaking process. This allows them to check the quality of the raw materials used for production and to bring out the flavor of the wine. The titration also helps to test the batch during fermentation, and is used for final quality control.
Automotive Industry: The automotive industry uses the titration process to produce biodiesel oil. A special pH level is required to ensure the functionality of biodiesel oil. For this purpose, titration is useful. Manufacturers measure the pH level of biodiesel and then determine the amount of base used to achieve the desired pH level.
Food & Beverage Industry: The Food & Beverage industry primarily uses titration techniques for two purposes – regulatory requirements and quality control. Every producer should test and measure the quantity of different minerals in the food & beverage production. The presence of these minerals is determined by precipitation and complexometric titration.
Manufacturers use acid-base titration for quality control. It is important to control the taste, texture, nutrition, consistency and appearance of produced food.
Cosmetic Industry: To ensure quality production of cosmetics, manufacturers need to add appropriate concentration and quantity of chemicals. The titration process helps manufacturers determine the most suitable base for cosmetics, for example, coconut oil is used as a base in many products.
Burette Uses in Laboratory: Burette is a laboratory apparatus commonly used to dispense and measure variable amounts of liquid or sometimes gas within chemical and industrial testing specially for the titration process in volumetric analysis.
Burettes can be specified according to their volume, resolution, and accuracy of dispensing. Smaller diameter tubes result in lower volume and increased resolution. Digital burettes can achieve better accuracy and are less dependent on the skill of the technician.
The first burette was created by chemists in the 19th century. It consisted of a simple glass tube with valves and later added graduations. This basic design is still widely used in glass burette. This should be carefully observed at eye level, ensuring that the liquid is free of bubbles and the reading is taken at the bottom of the meniscus. The delivered volume is the difference between the initial and final readings of reagent.
Types of Burette
There are three types of burette:
In laboratories, types of burette include Volumetric, Piston/Digital, and Electronic. Each type of burette serves specific functions, making them essential for precise liquid measurements in various experiments. Understanding these types of burette is crucial for accurate laboratory work.
1. Volumetric Burette
A volumetric burette is made of glass or plastic material, with a volume scale printed on the burette wall. It has a stopcock at the end of the instrument, and a valve to control the flow of liquid. The barrel of a stopcock is made of glass or plastic. Burettes are usually fixed with a clamp in an iron stand. Normally, volumetric burette can be classified as:
- Liquid burette
- Gas burette
On a liquid burette, it has a long graduated glass tube with a stopcock at the bottom to control the flow of liquid. Gravity causes fluid to flow when the valve is opened. The exact amount of liquid can be determined by reading the volume marked on the glass tube.
 |
In a gas burette, the stopcock is given at the upper side of the burette. The tube of the burette is filled with a fluid, such as water, mercury or other kind of liquid and is attached to a reservoir of fluid at the bottom of the tube. The gas is collected by displacing the fluid from the burette, and the volume of the gas is measured by the volume of the displaced fluid.
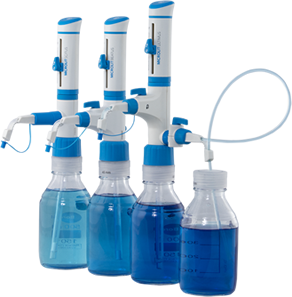
2. Piston or Digital Burette
A piston or digital burette is based on a syringe design wherein the barrel and plunger can be made of glass or plastic. For alkali solutions, the barrel and plunger may be made of polyethylene or another resistant plastic material. The barrel is placed in a fixed position and the plunger is moved incrementally by rotating the wheel by hand or by means of a step motor.
The volume is shown on a digital display given at the top of the burette. A high-precision syringe can be used to deliver a very precise amount of liquid. Motorized digital burette can be controlled by a computer.
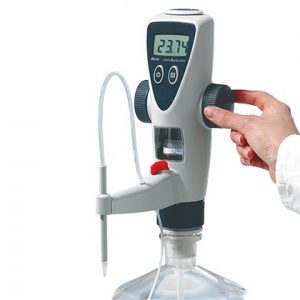 |
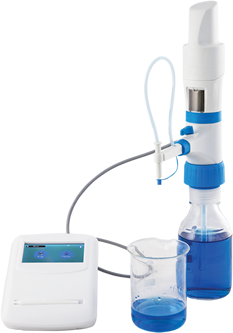
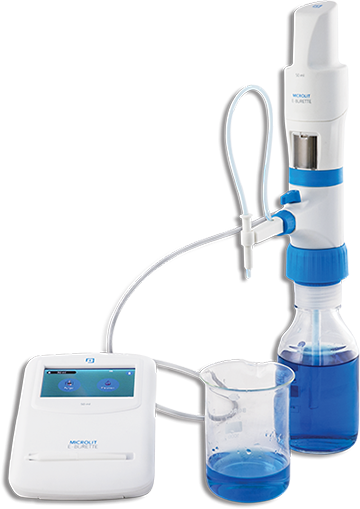
3. Electronic Burette
The Electronic Burette or E-Burette has an electronic display, electronic control panel and motor controlled piston movements that eliminates all problems of the digital burette which dispense manually. The accuracy of electronic burette is higher than a digital burette due to motor controlled dispensing. This motorized system eliminates the human errors from the titration/dispensing process that makes the titration more precise.
 |
Components of a Burette
-
Components of Volumetric Burette:
Volumetric or glass burette consists of a graduated glass tube with a stopcock at one end. The precise liquid dispensed can be determined by volume marking given on the glass tube surface. A Tip is given at the other end of the glass burette which is used to dispense liquid precisely. The Stopcock helps to control the flow of liquid by rotating it clockwise or anti-clockwise.
-
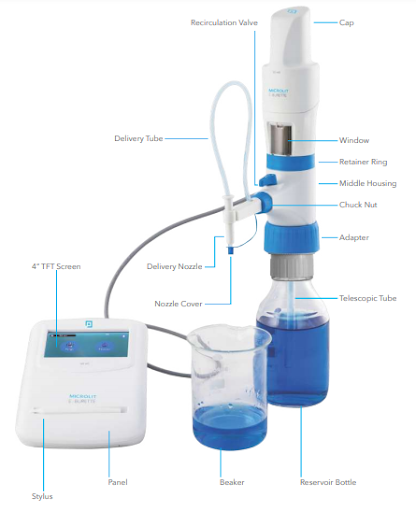
Components of Electronic Burette:
E-Burette is an electronic device that delivers accurate and convenient titration while reducing the risk of accidental chemical contact. It includes some advanced components that reduce manual operation with high work efficiency. Some major components of E-burette are:
Recirculation Valve – It prevents the loss of reagents during purging by re-directing them into the mounted bottle.
Delivery Tube – Delivery tube provides the facility to deliver the reagent beyond the reservoir.
Inspection Window – The transparent acrylic window can be replaced with an amber colored window for the use of chemicals. These chemicals such as iodine, potassium permanganate, and silver nitrate solutions are sensitive and can react in light. To protect these chemicals from such reactions, an amber-colored window is used that can be easily changed.
Delivery nozzle – Delivery nozzle provides a high degree of flexibility in both the horizontal and vertical directions, facilitating easy dispensing according to different laboratory conditions.
TFT Screen – A user-friendly TFT touchscreen guides quick and accurate titrations and displays numeric data up to the second decimal. It is easily operated with Stylus.
Telescopic tube – The telescopic tube is used to draw up the liquid from the reagent bottle to e-burette. It can be adjusted in length according to a variety of bottle sizes.
Adapter – E-burette comes with different standard sizes of adapter that comfortably fit most laboratory reagent bottles. The standard sizes of adapters are 28mm, 32mm, 38mm, 40mm and 45mm.
Stylus – It is a sleek hand-held instrument like pen used to operate the control panel with ease.
Control Panel – E-Burette comes with a powerful control panel that is used to perform functions like automatically re-fill without changing the reading, perform a zero reset (via. tare). switch the instrument off etc.
Middle Housing – It consists of a piston mechanism inside the burette.
 |
-
Components of Digital Burette:
Digital burette is different from e-burette, although many components have the same functionality. Recirculation Valve, Delivery Tube, Inspection Window, Telescopic tube and Adapters have the same functionality like Electronic Burette. The digital burette only has an electrical display but the piston movement is manual which can be operated manually using a wheel.
A digital display allows the user to note the volume of the liquid dispensed out of the burette. This feature eliminates meniscus reading errors. A hand wheel gives you the facility to set the amount of dispensed liquid by rotating it clockwise or anti-clockwise.
Various buttons including ON/OFF button, CLEAR/Selection button and Pause Button are available at upper housing of the digital burette that helps to control the dispensing process.
Technical Specifications of Burette
An Electronic Burette comes in different sizes and the most popular volume ranges are 10ml, 25ml and 50ml in capacity. The technical specification of these burettes are listed below along with their permissible error limits as specified in the DIN EN ISO 8655-3.
| Capacity (ml) |
Increment (ml) |
Accuracy (± %) |
Accuracy (±ml) |
CV (± %) |
CV (±ml) |
| 10 | 0.005 | 0.1 | 0.01 | 0.1 | 0.01 |
| 25 | 0.01 | 0.07 | 0.0175 | 0.05 | 0.0125 |
| 50 | 0.01 | 0.05 | 0.025 | 0.05 | 0.025 |
How to use a Burette?
The main steps to use a Electronic burette are given below:
Connecting the batteries
- Open the battery panel at the back of the control panel.
- Connect the battery connector to the panel wire by inserting the battery connector into the panel, and then close the panel.
- Press the ON/OFF button. The screen will display “Welcome”.
 |
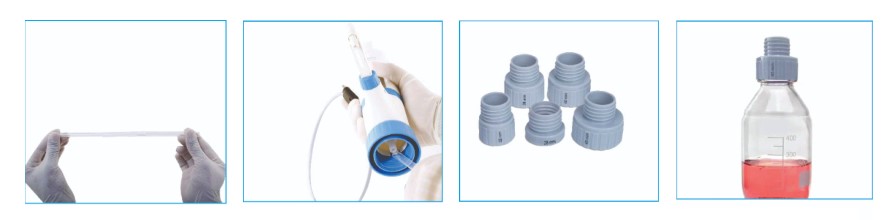
Setting Up
- Adjust the length of telescopic tube according to reservoir bottle length
- Fix the telescopic tube at the bottom of the burette. Fix it from the wider end.
- Choose the correct adapter according to the reservoir bottle and fix it by screwing it in a clockwise direction.
- Mount the instrument on a reservoir bottle by screwing it with gentle hand torque.
 |
- Connect the cable from the instrument housing to the port at the back of the control panel.
- If the charging is required, insert the charging pin at the back of the control panel and connect the power cord. Battery indicator will show the charging.
- Now E-burette is now ready to be switched on.
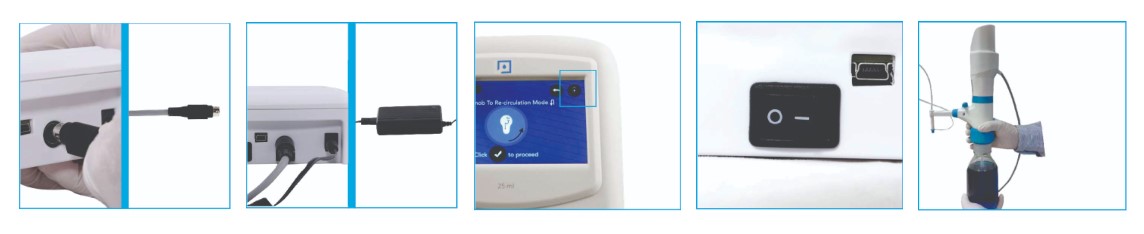 |
Operating the Instrument
- Switch on the instrument using the ON/OFF switch at the back of the control panel.
- When it boots, the instrument will warn the user to switch the knob to recirculation mode.
- After turning the knob to recirculation mode, click the tick mark on the control panel screen when ready.
- Instrument will reset automatically, now it is ready to use.
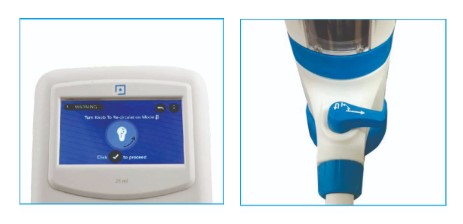 |
Before starting using the digital burette, it is recommended to ensure bubble free dispensing:
- Click the purging mode from the home screen on the control panel.
- The screen on the control panel will warn the user to turn the knob to recirculation mode.
- Turn the knob to recirculation mode and click the tick mark on the control panel screen when ready.
- The digital burette will purge automatically. If the instrument is still not properly purged, repeat the purging process again till no large air bubble is visible below the piston.
 |
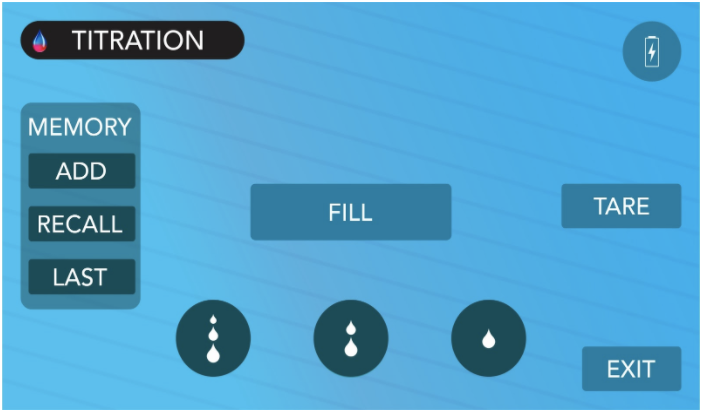
E-burette is commonly used in the titration process to determine the concentration of an unknown solution. Typically, titrant (known solution) is added from a burette to a known volume of analyte (unknown solution) until the reaction is complete. An indicator is used to find the endpoint of the titration.
Once the E-burette is properly setup, follow the steps below to perform the titration process.
- Remove the cap from the discharge tube.
- Click on the titration mode on the home screen. The screen on the control panel will warn the user to turn the knob to titration mode.
- Turn the knob clockwise to set at titration mode and click the tick mark on the screen of the control panel when ready.
- Place the discharge tube orifice against the inner wall of a suitably receiving vessel.
- Now fill the barrel from the titration screen by clicking the fill button. By pressing the stop button, the filling volume can be stopped as and when you need to.
- Microlit E-burette offers the free dispensing speeds are provided, including dropwise dispensing that allows the user to get accurate end point of the titration:
| Burette Model | Mode | Speed |
| 50 ml | Fast | 3.8ml/sec |
| Medium | 1.3ml/sec | |
| Dropwise | 10ul/click | |
| 25 ml | Fast | 2.1ml/sec |
| Medium | 0.7ml/sec | |
| Dropwise | 10ul/click | |
| 10 ml | Fast | 1.2ml/sec |
| Medium | 0.2ml/sec | |
| Dropwise | 5ul/click |
- Ths user interface is very responsive and the dispensing starts by clicking the appropriate button on the control panel and stops immediately when the touch is removed.
- Press the TARE button to reset to Zero and repeat the process.
Difference between Burette and Pipette
Burette and pipette are both analytical tools. However, a significant difference between the burette and the pipette is in the release mechanism. The burette has an open top and small exit point at the bottom of the tube, which closes with a stopcock. A tester pours liquid into the burette from the top until the required volume reaches the marker. However a digital burette has an automated system to draw up the exact amount of liquid from the bottle.
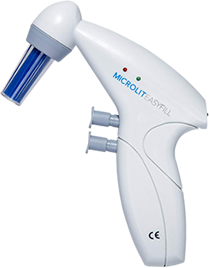
A pipette requires a suction device at the top end, which changes the pressure inside the tube to pull the liquid upward through the tapered end from a container of liquid. As long as the suction pressure remains on the pipette, the liquid remains inside the tube. When the suction is removed, the liquid falls out because there is no mechanical locking system in the lower end of the tube like a burette.
Usually, Burettes are larger than pipette with higher capacity of liquid to dispense. That’s why, the accuracy of burette in releasing small volumes is lesser than pipette. Also, most of the advanced burettes have completely automated systems while pipettes are still hand operated to dispense desired amount of liquid.
Burette Vs Pipette
| Burette | Pipette | |
| Definition | A graduated glass tube with a stopcock at one end, used to deliver a known amount of a liquid, specially for titrations. | A pipette is a common yet an essential laboratory tool, used to accurately and precisely transfer desired volumes of liquid in the microliter range. |
| Releasing Mechanism | Have a stopcock at the end to control the release of the liquid. | Has a dropper like system that releases desired amount of liquid by lessening vacuum. |
| Size | Usually larger than a pipette. | Usually smaller than a burette. |
| Accuracy | Less accurate in dispensing small amount of liquid. | More accurate in dispensing small amount of liquid. |
| Operating | Most of the advanced burettes are automated or very less manual. | Completely hand-operated. |
Difference between Burette and Bottle Top Dispenser
The basic difference between a Burette and a Bottle Top Dispenser is its use and accuracy. Burette is used exclusively for the titration process, where the Bottletop Dispenser provides only functionality of the Liquid dispensing. Due to the large amount of liquid handling with the bottle top dispenser, the accuracy of BTD is much lower than that of Burette.
Another major difference between burette and BTD is its functionality. Burette gives you the functionality to dispense the liquid in different modes where you can also identify the precise volume of dispensed liquid. BTD has no feature to identify the dispensed volume of liquid that makes it useless for titration. BTD can transfer the precise amount of liquid in a single dispense circle.
Cleaning, Maintenance and Storage of a Burette
The maintenance of electronic burette is an important routine in any chemical laboratory. Adopting a proper maintenance schedule can reduce the cost of purchasing new equipment. Cleaning the e-burette takes time and practice, otherwise the equipment may deteriorate. Therefore it is necessary to handle the burette carefully while cleaning.
The instrument must be cleaned in the following situations to ensure the correct operations and test results:
- Immediately, if the piston become harder than normal use
- Before changing the reagent
- Prior to long term storage
- Prior to dismantling the instrument
- Regularly when using crystallizing liquids
- If the liquid has accumulated in the screw cap of the titration tube
Note: The piston cylinder, valves, telescoping filling tube and titration tube may contain the reagent. The necessary safety steps must be taken before cleaning the instrument.
Standard Cleaning of Burette:
Whenever cleaning is required, run the burette under distilled water.
- Fill the barrel completely with distilled water and press the fast dispense button to dispense the water completely.
- Place a suitable receiving vessel below the opening of the discharge tube, and rinse the instrument several times by completely filling and emptying it.
- Set the valve to recirculation and rinse the instrument several times by completely filling and emptying it.
- This process can optionally be repeated with a suitable cleaning agent.
- Unscrew the chuck nut by rotating it in anticlockwise direction and pull out the delivery pipe. Clean the delivery pipe with deionized water and assemble it again.
- Next, rinse the burette again with deionized water.
Intensive Cleaning of Burette:
The dispensing cylinder, valve, telescoping filling tube and titrating tube are filled with reagent. For this reason, always perform a standard cleaning before dismantling the instrument.
In order to avoid confusion about the components, do not dismantle more than one instrument at a time. A calibration, and any necessary adjustment, must be carried out after dismantling or replacement of a piston/cylinder assembly.
Note: Use rubbing alcohol on a cloth or cotton to clean the external body.
Proper storage of digital burette is as important as cleaning and calibrating the instrument. The digital burette and its all accessories must be stored in a clean, cool and dry place. The storage temperature should be ranging from –20 °C to +50 °C (from –4 °F to 122 °F) is advised with relative humidity between 5% and 95%. Another point to be remembered is that the instrument should be stored in an upright position as recommended by the manufacturer. .
Calibration of a Burette
A gravimetric testing based recalibration of the burette is recommended every 6-12 months depending on the following factors:
- Frequency of use
- Changes in environmental conditions
- The viscosity of the media
For Microlit E-Burette, gravimetric volume testing according to DIN EN ISO 8655-3 should be performed as follows:
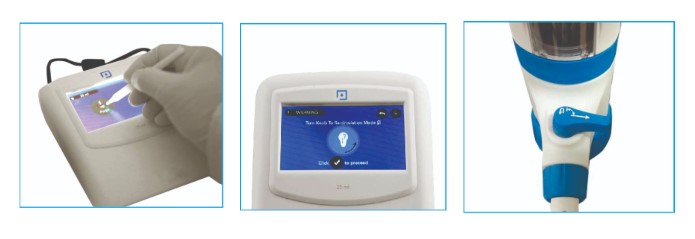
- Click the settings icon on the bottom right of the control panel home screen.
- From the settings menu, choose calibration.
- Fill the nominal volume of double distilled deionized water by clicking the FILL button on the calibration screen of the operating panel.
- Dispense the filled liquid by clicking on the DISPENSE button on the calibration screen of the control panel.
- Measure the dispensed liquid on a balance and enter the value in mg using the provided electronic keyboard. Click the tick mark to proceed. CAL label will start appearing on the top of the screen.
- Repeat the procedure until the nominal volume is achieved on the electronic balance.
Calculation of a Burette Reading
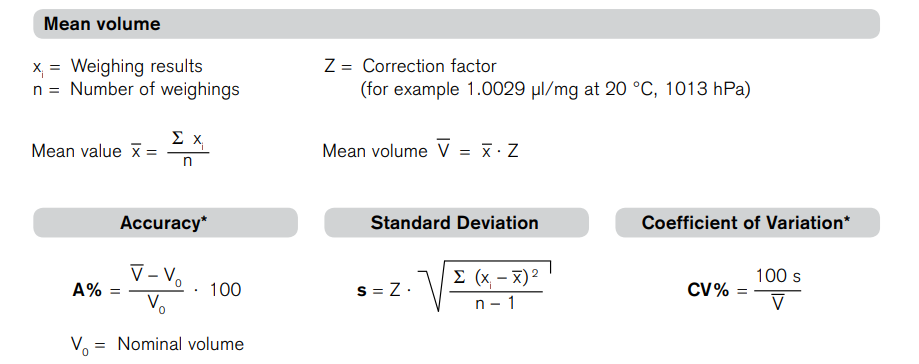 |
Calculation of accuracy (A %) and coefficient of variation (CV %) are calculated according to the formulas for statistical control.
When is burette calibration required?
In order to maintain the quality of titration results, the burette must be in good condition and properly calibrated. Generally, the interval at which a burette needs to be calibrated depends on several factors:
- Frequency of burette use
- Type of liquid dispensed by the burette
- Long period of non-usage
- Handling and care of burette
- Titration applications that require superior accuracy also demand more frequent calibration
Regulations and standards published by organizations such as the FDA and ASTM International provides minimum requirements to ensure the quality of laboratory testing results. Regulations specify that all laboratory instruments used in sampling & productions including pipette/ burette must be routinely calibrated at suitable intervals.
In the same series, the Clinical and laboratory standards institute (CSLI) has provided the guidelines for pipette/ burette that specifies these instruments must be calibrated every 3 to 6 months. And a minimum of two volumes must be tested with 10 replicas at both nominal and lowest settings.
Establishing an appropriate calibration frequency minimizes the chances of incorrect liquid delivery in the laboratory and ensures traceability, accountability and confidence in the results.
Applications of a Burette
Burette is commonly used in the titration process for quantitative analysis in many industrial chemical testing where a solution of known concentration is used to find the concentration of an unknown solution. The process of titration is widely used in various industrial applications listed below:
- Pharmaceutical industry: Purity analysis, Content analysis, Precipitation titration, pH-stat titration
- Wine industry
- Automotive industry
- Food and Beverage industry
- Cosmetic industry
Choosing the right Burette
Choosing the best burette for your application can be a challenging task as the liquid handling market has a variety of options. Before selecting a burette for your lab, it is necessary to consider a few questions:
- Is the burette able to handle your typical volume range of liquid required for titration?
- Does the burette provide different speeds for dispensing for proper titration?
- Is it operated manually or automatically?
- Is the accuracy and precision in reading offered by the burette in accordance with the ISO standards?
The above points ensure correct burette procurement that will work for a long time and improve titration activities in your laboratory.
Microlit E-burette is an advanced laboratory instrument designed keeping ergonomics and smooth operation in mind. Microlit E-burette provides sophisticated burette features and burette functionality such as touch screen enabled control panel with graphical user interface (GUI), motor-controlled piston movement and three dispensing speeds to perform accurate titrations.
|
3 Pre-set Dispensing Speeds
Microlit E-burette offers the 3 calibrated pre-set speeds that allow the user to work at the desired speed while avoiding manual error.
The dropwise dispensing option in the MicroLit E-burette allows the user to choose this mode when they are about to reach the end-point of the titration process. The dispense droplet can be as small as 5.0ul and record a highly accurate end-point of the titration.
TFT Touch Screen Control Panel
The TFT touchscreen of the control panel helps the user to perform quick, easy and accurate measurements, and displays numerical data up to two decimal points. The user needs a Stylus and keeps it pressed against the screen to perform dispensing and lift it to stop. The touchscreen feature also omits any parallax error which normally occurs in glass burettes when it is not viewed from a perpendicular position.
 |
Motor Controlled Piston Movement
Dispensing is done manually in glass and digital burettes leading to inaccurate results. However the MicroLit E-burette has a motor controlled piston speed that allows laboratory personnel to work efficiently as it does not need to oversee the delivery process at every moment. 3 Pre-set speeds reduce human effort as well as errors which makes it the most efficient lab instrument for liquid handling.
Burette Troubleshooting
| Problem | Possible Cause | Solution |
| Piston difficult to move |
|
|
| Filling not possible |
|
|
| Air bubbles in the instrument |
|
|
| The volume delivered is smaller than that indicated |
|
|
| The instrument doesn’t indicate any function |
|
|
For more information about Microlit E-Burette, visit: Microlit E-Burette.